
Interface Tour
Each area of the project window has its own page with details.
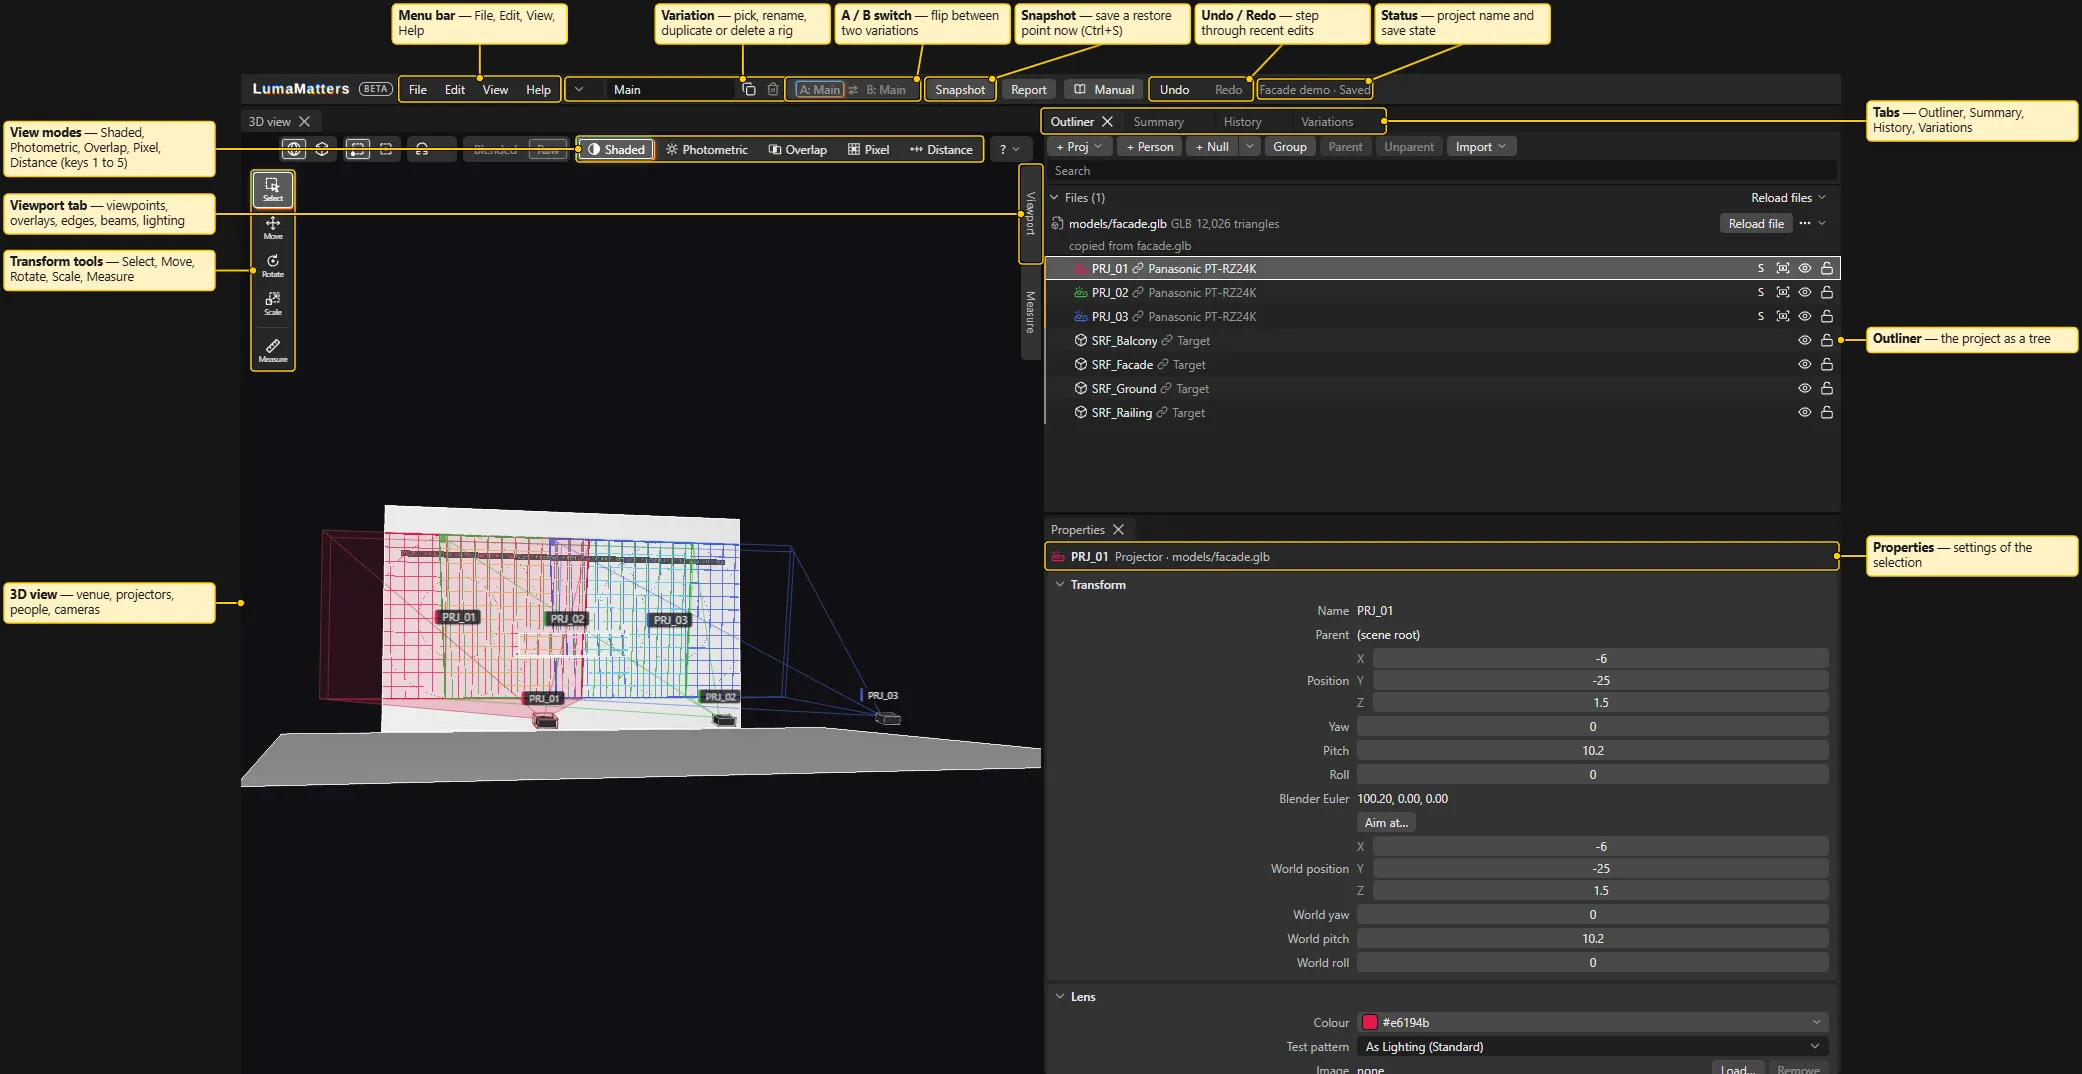
The layout
Section titled “The layout”The project window is split into panels. This is the default layout:
- The 3D view fills the left half.
- On the right, at the top, are the tabs Outliner, Summary, History and Variations. The Outliner tab is in front.
- On the right, below those tabs, is Properties.
Drag a tab to move it. Drag a panel border to resize it. Close a panel with its tab button. The app keeps the layout on this machine.
The Report tab is not in the default layout. Open it with File > Export > Report…, View > Report, the Report button in the header bar, or Ctrl+P. When it is in front, it fills the whole window. See Report and PDF.
Panels menu and Reset layout
Section titled “Panels menu and Reset layout”- View > Panels lists the six panels: 3D view, Outliner, Summary, History, Variations and Properties. A tick means the panel is open. Click an entry to open or close the panel. A reopened panel returns to its usual place.
- View > Reset layout puts all panels back in the default places.
The header bar
Section titled “The header bar”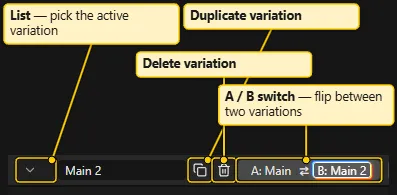
The thin bar at the top holds these items, from left to right:
- The app name LUMAMATTERS, followed by a small BETA mark while the app is a beta build. You cannot click the mark. The same mark is on every report page. See What’s new.

- The menus File, Edit, View and Help. See Menus.
- The variation selector. It has a list button, the name of the active variation, Duplicate variation and Delete variation. Click the name to rename the variation. The Switch variation A / B button sits beside them. A variation is one rig of projectors on the shared venue. See Variations and Compare.
- Snapshot. It does the same as
Ctrl+S. - Report. It opens the Report tab.
- Manual. It opens the online manual in your web browser.
- Undo and Redo. They are greyed out when there is nothing to undo or redo.
- The status line, for example
My project · Saved. It can also saySaving…,Paused: changed on diskorNot saved: <reason>. After the status, it names the snapshot your work is based on (· snapshot 0012). See Projects and Snapshots. - Analysing… with a small bar while the app recomputes the numbers. A second bar shows while textures load.
Banners can appear under the header bar:
- A slow-view warning when 9 to 16 projectors are in the analysis.
- A notice that a file changed on disk.
- An error banner when the analysis failed.
The 3D view
Section titled “The 3D view”The 3D view shows the venue, projectors, people and cameras. Controls sit on top of it.
- Left edge: the tools Select (
Q), Move (W), Rotate (E) and Scale (R). Below a divider is the Measure tool (M). - Top strip, right end, in order:
- World or Local (the space of the gizmo axes).
- Origin or Box centre (the pivot).
- The Magnet and the Snap steps arrow beside it.
- Light Blended or Raw.
- The five view-mode buttons: Shaded, Photometric, Overlap, Pixel and Distance.
- The ? help button.
- Right edge: the Viewport tab opens the view settings. The sections are View (viewpoints and cameras), the overlays Labels, Tex and Grid, the grid settings, Edges, Surfaces, Beams, Background and Lighting. A Lock button appears while you look through a camera.
- Right edge, below Viewport: the Measure tab opens the Measure sidebar (
N). Only one of the two side tabs is open at a time. See Measure Tools. - Floating legend: a card that shows the legend of the current view mode (Photometric, Overlap, Pixel or Distance). It starts at the lower left. Drag it by its grip. Double-click the grip to put it back.
Details: 3D View and View Modes.
The Outliner
Section titled “The Outliner”The Outliner lists the whole project as a tree. The tree holds model files, venue objects, projectors, nulls, people and cameras. The Measurements group is at the end. At the top are a toolbar and a search field. The toolbar has + Proj, + Person, + Null (with an arrow for a venue null), Group, Parent, Unparent and Import. See Outliner.
Properties
Section titled “Properties”Properties shows the settings of the selection. It can show transform, projector lens and zoom, surface role and reflectance, texture, person and camera. See Properties.
Summary and History
Section titled “Summary and History”Summary shows the venue status, the numbers of the analysis and the probe. History lists the snapshots of the project. See Summary and History.
Variations
Section titled “Variations”The Variations tab lists the variations of the project. It also compares them. See Variations and Compare.
Dialogs, toasts and tooltips
Section titled “Dialogs, toasts and tooltips”- A greyed-out menu entry or button shows a tooltip. The tooltip says why you cannot use it, for example “Open a project first.” or “Nothing to undo.”
- Short messages appear as toasts.
- The Help menu opens its dialogs over the window: View modes…, Keyboard shortcuts, Blender export…, Send feedback… and About LUMAMATTERS. See Menus.
- Menus and header buttons are inactive during a drag or a file operation. This is on purpose.
- If another window has the same project open, this window is read-only. The header bar shows
Read-only: open in another window.
Look and feel
Section titled “Look and feel”The look follows Blender: a dark theme, foldable panel sections and number fields you drag. The app uses its own code and icons. The Outliner works like the Outliner in Maya. Number fields have a Value Ladder, as in TouchDesigner. See Properties.
See also: Menus, 3D View, Outliner, Keyboard Shortcuts, Measure Tools